Practical audio theory
You have 2 speakers in front of you. So you can place the sound to the left, or to the right. Moving the sound to the front or back is not possible.
But with the right techniques you can fool the ear so it thinks something sounds closer to you or farther away from you. And that’s what I always call ‘3D mixing’. One of the most important ingredients for a good mix. If you mix in ‘3D’, you can be sure you mix will translate much better. Whether it is played back on an iPhone or your home cinema set. So I will talk about this ‘3D’ mixing more often on this website. Maybe even more than you’d like. 🙂

But in order to be able to mix in 3D and understand what you have to do, you have to know something about sound. When I was studying to become an audio engineer 20 years ago, I had to learn a lot about audio theory. For example, I had to learn how to calculate the output of a pre-amp when 20dB of gain was applied and the microphone input was 0.17 volts.
In practice I wouldn’t use a calculation for that. It’s easy: if it’s too loud, you have to turn it down. So you won’t come across calculations like that here. Actually, you won’t find any calculations in this module. We are going to look at the theory that you will actually use when mixing.
Hz, kHz, frequencies…Say what?
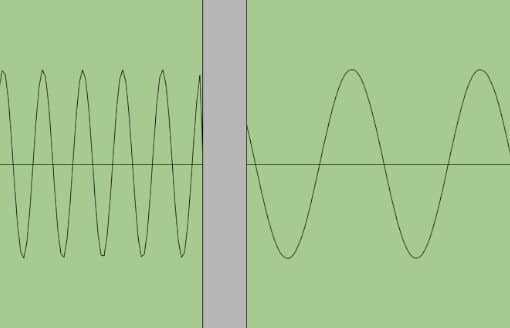
Sound is air that is vibrating. Our ears pick up those vibrations and our brains translate them into something we understand. There are very fast sound vibrations and very slow ones. Fast vibrations we hear as high tones (sound wave on the left in the image below), slow vibrations as low tones (sound wave on the right in the image below).
Just like we use ‘meters’ or ‘feet’ to measure distances, we use ‘Hertz’ (Hz) to indicate the number of vibrations per second. So 100 Hz is 100 vibrations per second.
That may sound like a lot, but 100 Hz is actually a low tone. We can hear sounds between 20 Hz (very low) and 20,000 Hz (very high). Or at least that is what we can hear when we are born. From 1000 Hz we usually talk about KiloHertz. So 1 KiloHertz = 1000 Hertz. And we write that down as 1 kHz, or sometimes just as 1 K.
Ok, so much for the quick course on frequencies. Useful to know something about because one of the most used tools in mixing is an equalizer. You can use it to adjust the volume of independent frequency bands. To bring out that extra bit of low end around 80Hz, for example.
Below is an overview of which musical instruments have a peak in which frequency range, so you have a frame of reference. And with ‘peak’ I mean that these frequencies sound the loudest with that instrument. Even though they will certainly produce more frequencies.
Bass guitar:
Low-end, body: 60 – 100 Hz
Strings / attack: 1-3 kHz
Vocals:
Intelligibility and clairity: 2 Hz – 6 Hz
Body: 120 Hz
Electric guitar:
Presence: 1kHz – 5 kHz
Body: 150-250 Hz
Kick drum:
Low-end, Body: 60 – 80Hz
‘Click’ / attack: 2-3 kHz
Snare drum:
‘Crisp’: 5 kHz
Body: 240 Hz
Cymbals:
Clairity and air: 7 – 12 kHz
Masking
Let’s talk about the ‘I can’t hear you because of all that noise!’-syndrome, also known as masking
You will probably know a situation like this. You are in a pub with some friends. One of them is talking, but someone else has something to add to that. And it’s kind of urgent. So she doesn’t wait to talk until the other one has finished speaking, but starts talking immediately.
The other person isn’t very happy with that, so he increases the volume of his voice a bit. And before you know it, they are in the middle of some kind of contest who can talk the loudest. Because if you keep talking at the same volume, nobody will hear you anymore. Well, that is called masking. One person masks the speech of the other.

Masking happens when two sounds are in approximately the same frequency range. Something to keep in mind when mixing.
Practical example: the frequencies that provide intelligibility in a vocal or voice-over recording are between 2 and 6 kHz. As you can see in the frequency overview in the part Hz, kHz, Frequencies…What? an electric guitar also has a peak in about that same range. It overlaps. So an electric guitar will mask the vocal track very quickly, you don’t even have to turn it up very loud. A bass guitar will eventually also mask the vocals, but you’ll have to turn it up much louder before that happens.
If you try to mix a voice-over/vocal track with music track that happens to contain a lot of electric guitar, you’ll notice you will have to turn it down a lot to make sure it doesn’t get in the way. But if you know that the problem is mainly between 2 and 6 kHz, it’s much better to grab an equalizer and just turn back those frequencies a bit in the guitar track. If you then add these same frequencies a little in the vocals/voice-over, you have reduced the masking effect even more. And now you can turn up that guitar track, so it will have the impact you want it to have!
Decibels
I have worked in all kinds of places in my audio carreer. At radio stations, at audio post production houses, in music studios and in dubbing studios. No matter where you go, one thing always causes confusion amongst colleagues: dB’s. You see the same confusion in audio magazines and at audio schools. So this is a very tricky subject you could fill a book with.
And yet I’m going to try to write down the basics in a few sentences. Wish me luck. 😉 Oh, and please let me know if you still have any questions after reading this part: gijs@audiokickstart.com.

Ok, so here we go. When I talk about a temperature of 35 degrees it can mean different things. Depending on if I am talking about degrees Celsius, Fahrenheit or Kelvin. They all have a different reference point. At 35 degrees Celsius it is pretty warm outside and many people will go to the beach and cool off in the sea. But at 35 degrees Kelvin that same sea is covered with a thick layer of ice and it’s so cold that there might not even be life.
The reference point is different. With Celsius it is the freezing point, but with Kelvin it is the absolute zero below which temperatures do not exist.
Why are we suddenly talking about the weather? Because it’s the same with measuring sound. We measure in decibels, but here too there are different reference points. And that’s the basis of all the confusion: If you set the volume of a recording to ’30 dB’, it doesn’t say anything about the loudness. You have to mention what reference point you use. For example dBFS or dBm. ‘FS’ and ‘m’ indicate the reference point. Below are the four reference points that you will come across most when mixing.
dB SPL:
SPL stands for Sound Pressure Level. The reference point is the absolute limit of our hearing. So 0dB = no sound. 100dB = a lot of sound. 130dB = too much sound, it hurts your ears.
dBFS:
FS stands for ‘Full Scale’, the scale used in digital audio equipment. You will find it on most plugins and in your DAW. The reference point here is the loudest sound you can record in digital equipment before it will overload. If you try to record something that is louder, it will distort right away. As a result, this scale uses negative values, like -10dBFS, or -40 dBFS. You will never see +40dBFS, because that would be louder than the loudest sound you can record.
dBm:
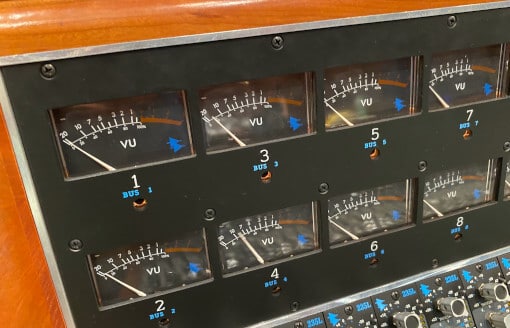
Many years ago a few people decided that all audio equipment should be able to be connected to each other. Without overloading the equipment. Great decision! So a reference point was needed. It makes most sense to agree that 0 dB is a certain amount of electricity in the equipment. The well-known VU meter you find on analog mixing consoles (see image above) shows this: if it points to 0 dB, the signal has the optimal level for that device. That’s all you need to know to understand the principle, but if you want to dive a little deeper, read on! 🙂 At that time 0 dB = 1 milliwatt at a resistance of 600 Ohm was chosen. After that a few more flavors were added, such as dBu and dBV. All with a different zero point, but all with zero points related to electricity.
dBu:
This one is a tiny bit more technical to explain. If you don’t want that, just remember that dBu uses yet another reference point related to a certain amount of electricity within audio equipment. So just like dBm. And for the people that want to know more: That one milliwatt at a resistance of 600 Ohm (dBm standard) produces a voltage of 0.775 Volt. In practice, 600 Ohm turned out to be a resistance that’s not very practical in audio equipment. So soon the reference point was changed to that 0.775 Volt, independent of the resistance. This is dBu. Nowadays dBu is still used in professional audio equipment. We use a slightly higher voltage these days by the way: 1.228 volts. That is 4dBu more than 0.775 volts. That is why these days we use +4dBu as our reference point (0 VU) on professional audio equipment.
The difference between mono and stereo
Here’s a philosophical thought for you: If you save a recording as a ‘stereo’ file, it’s not always stereo. It’s not just a matter of ticking the ‘stereo’ box.
Suppose you record a piano. You use 2 microphones. Everything the left microphone picks up is sent to the left speaker and everything the right microphone picks up to the right speaker. Now there are differences between left and right, for example because the left microphone picks up more of the low strings of the piano and the right mic more of the high strings. These small differences make the recording sound stereo.
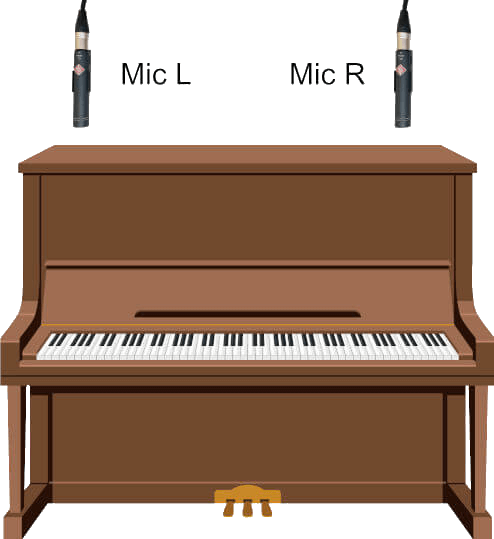
If you would record this piano with 1 microphone, the recording is mono. You can later choose to save this recording as a stereo file, but then the sound of the same microphone will be copied to both the left and right channel. Because both channels are now exactly the same, the recording will sound mono. There are no differences between left and right.
You can hear this very well when you’re sitting right in front of your speakers: the sound seems to come from the spot exactly in the middle between the two speakers. If so, your recording is mono. Even if you saved it as a stereo file. Listen to the difference in sound between these two files (when sitting right in front of your speakers or with headphones on):
Stereo
Mono
It’s just a phase…
Sometimes a recording can sound very ‘weird’ and bad, but you can’t really put your finger on it why that is. Well, this could very well be due to phase problems.
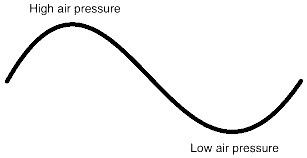
Sound is vibrating air. An alternation of high air pressure and low air pressure makes your eardrum vibrate. Such a sound wave is often pictured like this:
Suppose a friend plays the piano. You’re listening to it from the other side of the room. So some of the sound arrives directly at your eardrum, but some of it bounces off the walls or ceiling first. So it arrives just a little later.
What if the direct sound is in a state of high air pressure but the waveform that reflected off the walls is in a state of low air pressure when it arrives at your eardrum? It may sound strange, but in that situation they just cancel each other out.
Noise-cancelling headphones use this principle. And if both waveforms are in a state of high air pressure, they will amplify each other. Think of waves in the sea, they collide and influence each other in the same way.


If reflections of the sound collide and influence each other at random frequencies, you can probably imagine that the sound changes. Usually not in a good way. That is why studios spend a lot of time and money adjusting the acoustics to control reflections.
The delay of the reflections relative to the direct sound is expressed in degrees. If one sound wave is at its peak and the reflection of that sound wave is at its lowest point, then the phase difference is 180 degrees.

